Course Content
1.
Why Learn Python?
4 min
5 min
0
2.
What is the Best Software for Learning Python?
5 min
5 min
0
3.
Python List Functions
0 min
1 min
0
4.
All Python Operators (with examples)
0 min
1 min
0
5.
How to Declare a Variable in Python
2 min
3 min
0
6.
Variable Naming Rules and Conventions
8 min
6 min
0
7.
Use Descriptive Variable Names
4 min
3 min
0
8.
Integers and Floats
0 min
6 min
0
9.
Familiar Arithmetic (math) Operators
0 min
2 min
0

- Save
- Run All Cells
- Clear All Output
- Runtime
- Download
- Difficulty Rating
Loading Runtime
As a beginner, what software should I use to write Python for Data Science?
There are quite a few different approaches that you could take to get Python installed on your computer and to start writing code and to start working with third party packages (Like the ones we mentioned in the previous video (Numpy, Pandas, Matplotlib, Scikit-Learn, Tensorflow, Pytorch, etc.). It’s our goal to learn to use all of those tools –and more.
The traditional approach is not beginner-friendly
The problem is, that the process that you have to follow in order to get things setup and running on your own computer is not very beginner-friendly, like at all.
I’m not going to get into all of the what goes into this process, but just know that the steps for getting everything installed typically vary a lot based on the operating system that you’re using and this process usually involves running a variety of command line commands to install different tools –which can be scary if you’re not comfortable with the command line.
With the traditional approach there are a lot of different tools that you could use and the setup for each of them is just a little bit different so it can be confusing. But the biggest pitfall with the traditional approach is that if you when you’re setting up and installing everything, if you happen to follow a poorly made our out of date tutorial or just accidentally screw something up during this process, it can be a giant pain in the butt to figure out what has gone wrong and to undo the damage.
Don't let this be a roadblock to your learning!
I have spent hours and hours with new learners fixing (and occasionally failing to fix) their Python setup. A handful of times the learner has decided that the best course of action would be to back up their important files to an external hard drive, reformat their machine and completely start over from scratch rather than to continue trying to debug their tools. It can be that tough sometimes.
I have seen some beginners get so frustrated during this process that they have given up on their pursuit of learning Python and Data Science altogether.
I don’t want that to happen to you.
Absolute Beginners should use Google Colaboratory!
What if I could just hand you a computer that already had everything a budding data scientist might need pre-installed on it so that you could start writing Python say –by the end of this video? Well, I kind of can with a tool called Google Colaboratory.
What is Google Colaboratory?
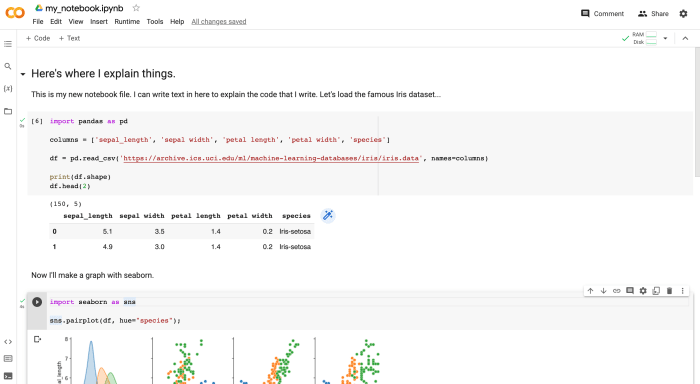
Google Colaboratory (also called Colab for short) allows you to write Python in a specific kind of document called an "IPython notebook”. Notebooks are the most popular tool for writing data science code. The industry standard notebook editor is called "Jupyter" and it's very similar to Google Colab, but typically working with Jupyter Notebooks requires all of the setup I talked about previously.

Google Colab works a lot like any other Google Drive Document. In fact, you may have never noticed, but it's been hiding in your Google Drive this entire time. So, you’ll need a Google Account in order to get started with Google Colab.
What is a cloud-based notebook editor?
Colab is what we call a "cloud-based" notebook editor because it doesn't run on our local computers. Instead, we access the notebook document through the web browser and the browser turns around and communicates with a computer at a Google datacenter –somewhere– to run and process our code. That’s why with Google Colab we get to skip all of the traditional setup –because Google has already installed everything we need on their machines in advance and we just talk to the google computer through the notebook interface.
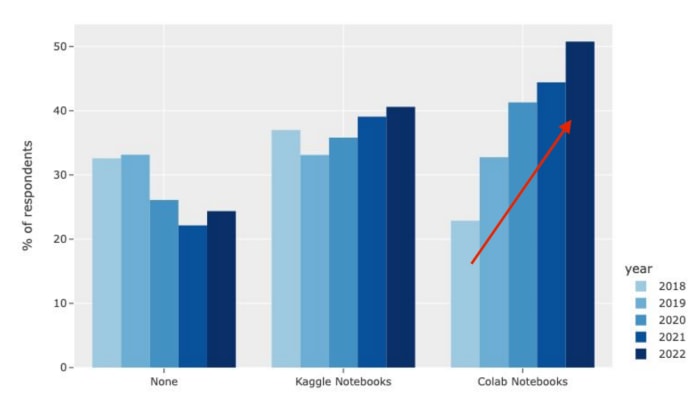
I've been encouraging my students to start with Colab for the past 5 years or so and during that time its popularity has been surging among industry professionals. It’s free to get started with, and it's a good tool –And its use is becoming commonplace in the industry.
Creating your first Colab Notebook
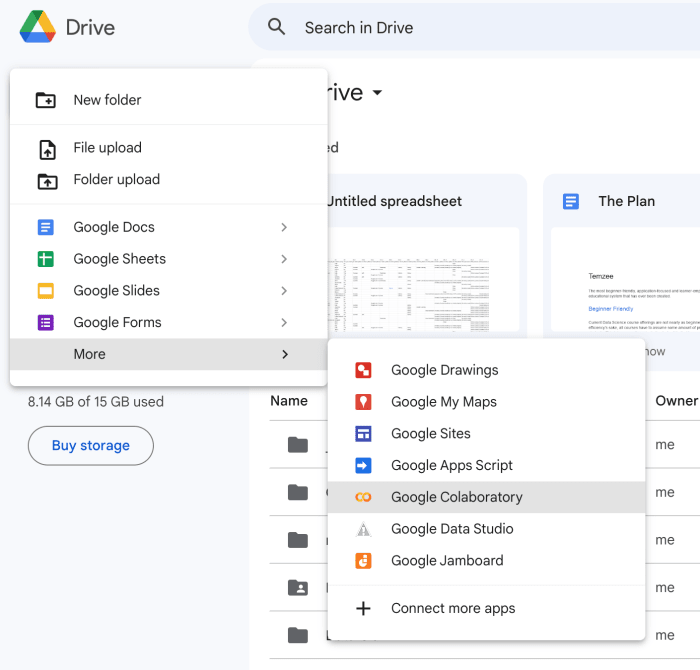
Let’s try openings new Colab Notebook together. There’s a couple of ways that you can do this. You can go to drive.google.com and then after clicking on the “+ New” button in the top left corner click on “more” at the bottom of the drop-down menu, and then you’ll see the Google Colaboratory option. Go ahead and click on it to open a new notebook.
Another way that you can open a notebook is by going to the URL colab.research.google.com. Login to your Google Account if you haven’t already and then click on the button “new notebook” I have this URL bookmarked so that I can easily open up new notebooks whenever I need them.

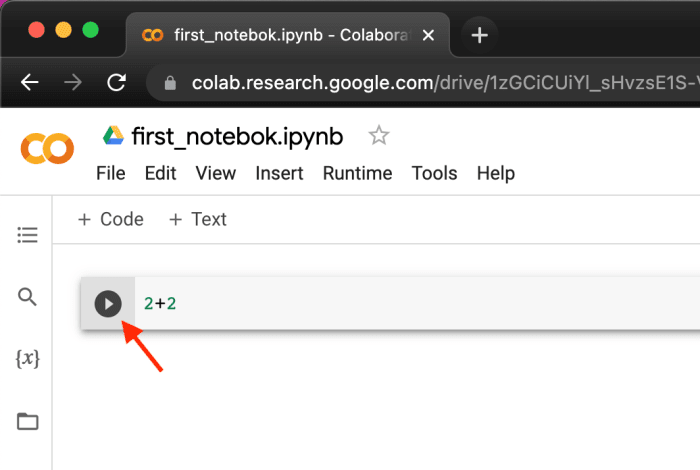
Go ahead and click on the code cell and type
2+2
And then click on the play button on the left-hand side to run the code. The first time you do this it might take a few seconds as the google computer that’s running in the background boots up.
Go ahead and make another code cell below that one by hovering your cursor just under the already existing code cell until the add a code cell button shows up, or use the add a code cell button found on the left side below the main menu.
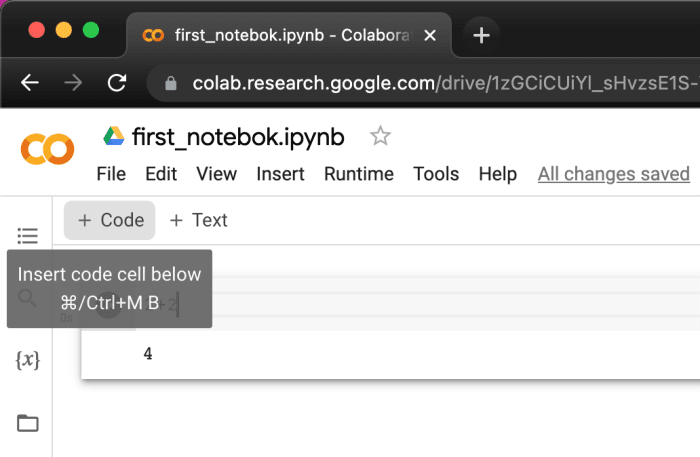
Once you have a second code cell created write
print(“Hello World!”)
And run this second code cell by clicking on the play button.
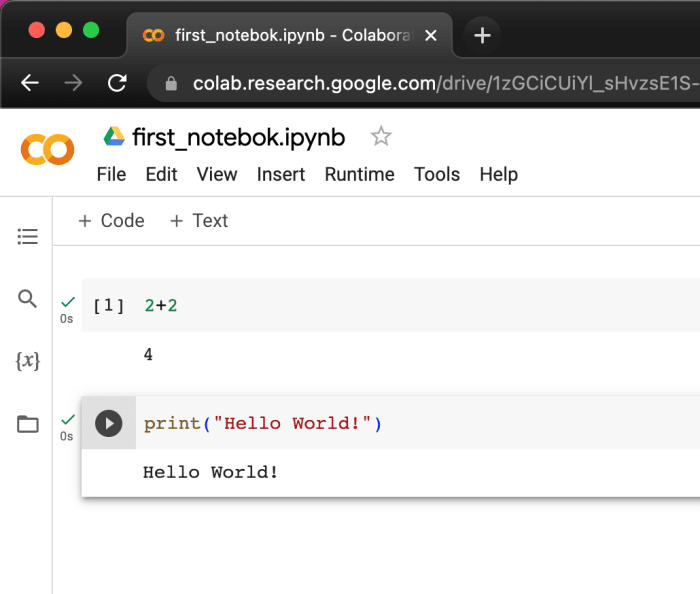
You’ve done it, you’re running Python code and this notebook’s ready for anything you can throw at it.
In the next video we’ll explore more of Google Colab’s features to help you get started using this tool productively.
